|
Winding the Wire
|
|
Step 1
|
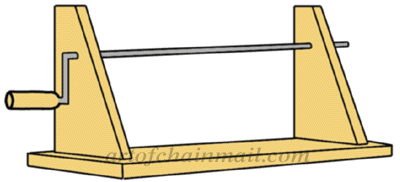
The first step in creating links is to create a helical coil of wire (basically a spring). The easiest way to do this is by using a tool called a Mandrel. In its most basic form a mandrel is simply a rod with crank handle on one end, placed between two vertical supports. Holes in the supports allow the rod to slide into position and spin freely. The diameter of the rod will determine the interior diamater of the finished links. More sophisticated mandrels replace the crank handle with a motor essembly. |
|
|
|
Step 2
|
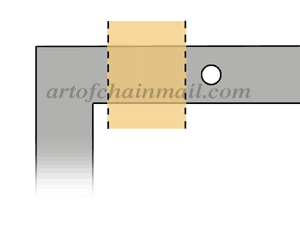
Before you begin to wind the wire you must attach it to the rod. The easiest way to accomplish this is to drill a hole in the rod that is large enough for the wire to pass through. I recommend putting the hole at the end of the rod that is closest to the crank handle. When placing the hole make sure to leave enough space for the hold to be on the inside of the support, as in the illustration. |
|
|
|
Step 3
|
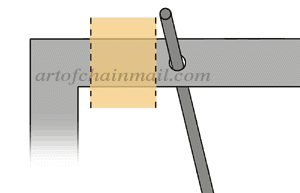
Put the end of your wire through the hole. Depending on the size of your wire spool you will want to mount it on a spindle so that it spins freely. I recommend that the spool be mounted in front of and lower than the mandrel, so that it doesn't get in your way. |
|
|
|
Step 4
|
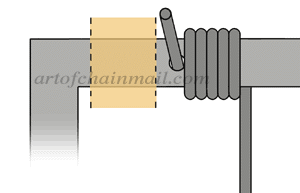
Slowly start to turn the crank handle to begin winding your coil. Turn the crank clockwise for right-handed links or counter clockwise for left-handed links. Most of you will want right-hand links and all the illustrations on this site reflect right-hand links. You can be sure that you're winding right-hand links if the wire is going onto the rod from the bottom, as in the illustration. As you turn the crank handle with your left hand, hold tension on the wire with your right hand and carefully guide the wire so that the coil winds evenly. You're wire spool should be mounted so that it can spin freely. When you reach the end of the rod cut the wire free at the hole and at the opposite end. Be careful, as you've spun the coil it has built up some tension, when you cut the wire this tension will be released.
Slide the rod away from the supports, then slide the finished coil from the rod |
|
|
|
Cutting the Links
|
|
Step 1
|
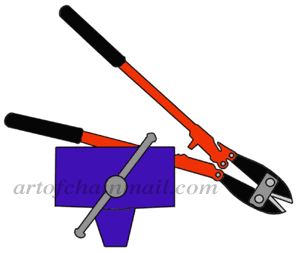
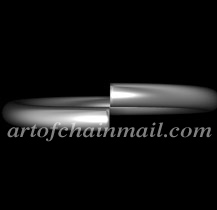
Cutting links well is one of the hardest parts of this entire process. There are probably as many theories of cutting links as there are makers of chainmail. I'm going to share the method that I consider the most useful to beginning makers of chainmail. The best links in chainmail have two characteristics that are governed in the cutting process. The most important of these characteristics is to have wire ends that are cut flushly, so that the ends of the wire butt together smoothly in the finished link. The finest links will butt together perfectly. Cuttings links with perfectly straight ends is just about impossible when dealing with a coil. The only kinds of cutters that cut wire flushly are "Bypass Cutters", but they don't fit into the coil. This leaves bolt and cable cutters as the main option for cutting links from the coil. While bolt and cable cutters tend to leave a slightly angled cut edge I still consider them the easiest method for beginning makers. Unless you tear phonebooks in half on a regular basis you will probably find it very tiring and downright painful to handcut links from the coil. To help alleviate this problem I recommend using a medium-sized set of boltcutters mounted in a vice. This allows you to use leverage to do all the hard work of cutting links. The cutters in this illustration are mounted for cutting with the left hand and holding the coil with the right hand. Right handed cutting is probably easier for most people, so set up the cutters in the manner that is the most comfortable for you. It is beneficial to put something under the jaws of the cutters to catch the links as they are cut. |
|
|
|
Step 2
|
To cut links from the coil insert the end of the coil into the mouth of the boltcutters and close the handle. Make sure that the edge of the cutter blade is as tight as possible to the end of the wire, if it is not tight then there can be a gap in your links. (illustration "B" below) Depending on the size of your coil and cutters you may be able to cut more than a single link at a time, it is a good idea to experiment. I've read some instructions for making links that suggest that you should stretch your coils before you cut them. The idea being that you can later avoid steps that involve bending the links open. It has been my experience that all this supposed time saving step does is create links that are highly misshapen. |
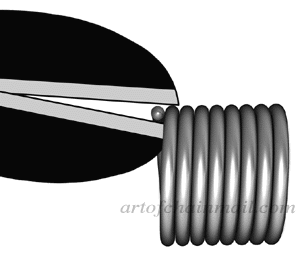
Illustration "A" - Cutting a Link, Side View
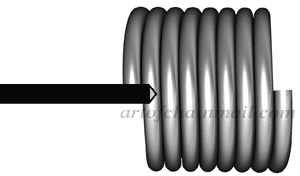
Illustration "B" - Cutting a Link, Top View
|
|
|
Step 3
|
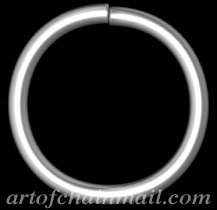
You should check you're links for consistency as you cut them. Make sure that they are staying as round as possible and that the gap is as tight as possible. |
|
|
|
Next Steps
|
Continue on to "Using Links" to learn the secrets of using your newly made links to create chainmail masterpieces! |
