|
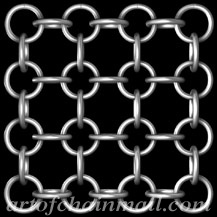
Hitoye-Gusari Mail (2/4 Grid)
|
|
Base Pattern
|
 Hitoye-Gusari Mail or 2/4 Grid is very close to me as it is the first mail pattern that I created.
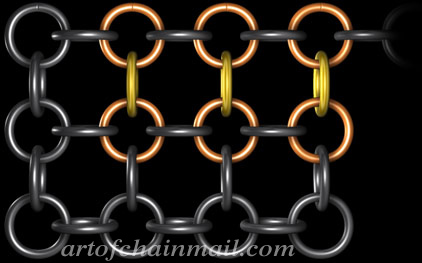
This is a historical Japanese pattern and while obviously weaker than European Mail patterns, Japanese Mail patterns in general were designed to be used in a completely different environment of arms and armour technology. In general they were never used for straight Mail Shirts. Rather, they were used over padded steel plates or to connect steel plates. I enjoy using Japanese patterns for a variety of projects as they are lighter and more breathable than European patterns. They also offer a lot of flexibility in their ability to be shaped, see my Hitoye-Gusari Glove for a good example of this. Hitoye-Gusari is particularly flexible when rotated 45 degrees, so that the grain is like a diamond, instead of a square. On the bias the pattern has an incredible ability to collapse around complex shapes, such as well-endowed chests. Hitoye-Gusari is also very popular in movies because it tends to film better than European Patterns. A Great example of this can be seen during the opening sequence of "Gladiator". Historically correct, the backline archers are wearing chainmail armour, but quite historically incorrect it is made of an enlarged Hitoye-Gusari that was specifically used because it shows up better on film. It is important to note that in Japanese patterns the links alternate between sitting horizontally and vertically. In authentic Japanese Mail patterns, the vertical links would be oval-shaped. If you wish to emulate these authentic patterns, make sure that all the gold coloured links in the following Japanese Patterns are oval-shaped. 2/4 Grid means that vertical links pass through 2 horizontal links and horizontal links pass through 4 vertical links to form a grid-like pattern. The later steps of this pattern are completely repetitive and are merely included to give you a feel for this pattern. |
|
The ratio of links for creating Hiyote-Gusari Mail is all open links. However, if you add this ratio to the ratio for creating the base Japanese 1 in 2 Chain, the overall ratio is 1 Closed Link to 2 Opened Links.
|
|
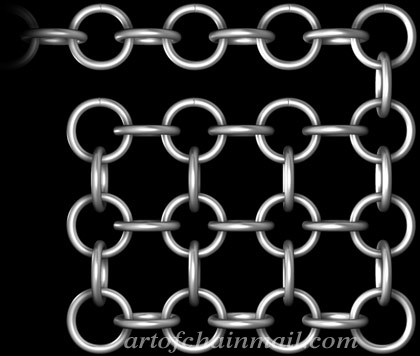
Starting Hitoye-Gusari Mail
|
|
Step 1
|
|

|
|
|
Step 2
Starting a Row
|
|

|
|
|
Step 3
1st attachment for a new row
|
|
 |

|
|
Step 4
Continuing to attach a new row
|
|
|

|
|
Step 5
Continuing to attach a new row
|
|
|

|
|
Step 6
Starting another Row
|
|

|
|
|
Step 7
Attaching a new row
|
|
|
|
|
Step 8
Starting another Row
|
|
|
|
|
Step 9
Attaching a new row
|
|
|

|
|
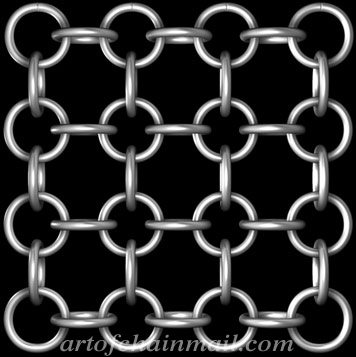
Finished Japanese Hitoye-Gusari Mail
|
|
