Return to European Patterns  |  Return to Chainmail Patterns Home


European 1 into 6 Mail
Basic Pattern
European 1 into 6European 1 into 6 is an advancement of the standard European 1 in 4 mail pattern. As far as I'm aware there is no historical basis for this pattern.

I have seen a lot of complicated variations for beginning this pattern. They are all ridiculously complex to a simple base understanding of European pattern structure in general.

Simply follow the rules of columns and rows set down in the Basic European 1 in 4 Pattern, except each link must pass through 6, instead of 4 others.

Thusly:

If the link you are adding goes through 3 links on the existing pattern, then it must also go through 3 new links.

If the link you are adding goes through 4 links on the existing pattern, then it must also go through 2 new links.

If the link you are adding goes through 5 links on the existing pattern, then it must also go through 1 new link.


The ratio of links for this pattern is 1 Closed Link to 1 Opened Link.


Starting
Step 1
  • Place an open link through six closed links.
  • Close the open link.
A Closed Link through 6 Closed Links An Open Link through 6 Closed Links


Step 2
Layout
  • Lay the first seven links out as in the illustration.

Layout for European 1 into 6 Mail


Step 3
Adding to the Column Edge
  • Place an open link through 2 closed links.
  • Place the open link through the 4 column edge links coloured copper in the illustration.
  • Close the open link.
An Open Link through 2 Closed Links
Adding to the Column Edge


Step 4
Adding to the Column Edge
  • Place an open link through 2 closed links.
  • Place the open link through the 4 column edge links coloured copper in the illustration.
  • Close the open link.
  • Repeat this step to make the pattern wider.
An Open Link through 2 Closed Links
Adding to the Column Edge


Step 5
Adding to the Row Edge Start
  • Place an open link through 3 closed links.
  • Place the open link through the 3 row edge links coloured copper in the illustration.
  • Close the open link.
  • Repeat this step each time you start adding a row.
An Open Link through 3 Closed Links
Adding to the Row Edge Start


Step 6
Adding to the Row Edge
  • Place an open link through a closed link.
  • Place the open link through the 5 links coloured copper in the illustration.
  • Close the open link.
An Open Link through a Closed Link
Adding to the Row Edge


Step 7
Adding to the Row Edge
  • Place an open link through a closed link.
  • Place the open link through the 5 links coloured copper in the illustration.
  • Close the open link.
  • Repeat this step to continue a new row, making the pattern longer.
An Open Link through a Closed Link
Adding to the Row Edge


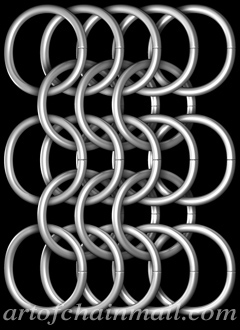
Finished European 1 into 6 Mail

The Finished European 1 in 6 Mail Pattern


Art of Chainmail Masters Kit - The Original Book plus 11 Tutorials!

Art of Chainmail Masters Kit - The Original Book plus 11 Tutorials!


Return to European Patterns  |  Return to Chainmail Patterns Home


Home  |  Suppliers  |  Links  |  Etsy  |  Satisfied Customers  |  Email

Interactive Photo Map  |  History of Chainmail  |  The Chainman Blog

The Art of Chainmail Sample  |  Chain Mail Jewelry  |  FREE Chainmail Patterns


All Content from this website is Copyright © 1998 - 2012 by Dylon Whyte.
All PDFs are printable for personal and educational use only. Please don’t waste trees.